> ## Documentation Index
> Fetch the complete documentation index at: https://docs.apexlink.com/llms.txt
> Use this file to discover all available pages before exploring further.
# Email Client Configuration
## Overview
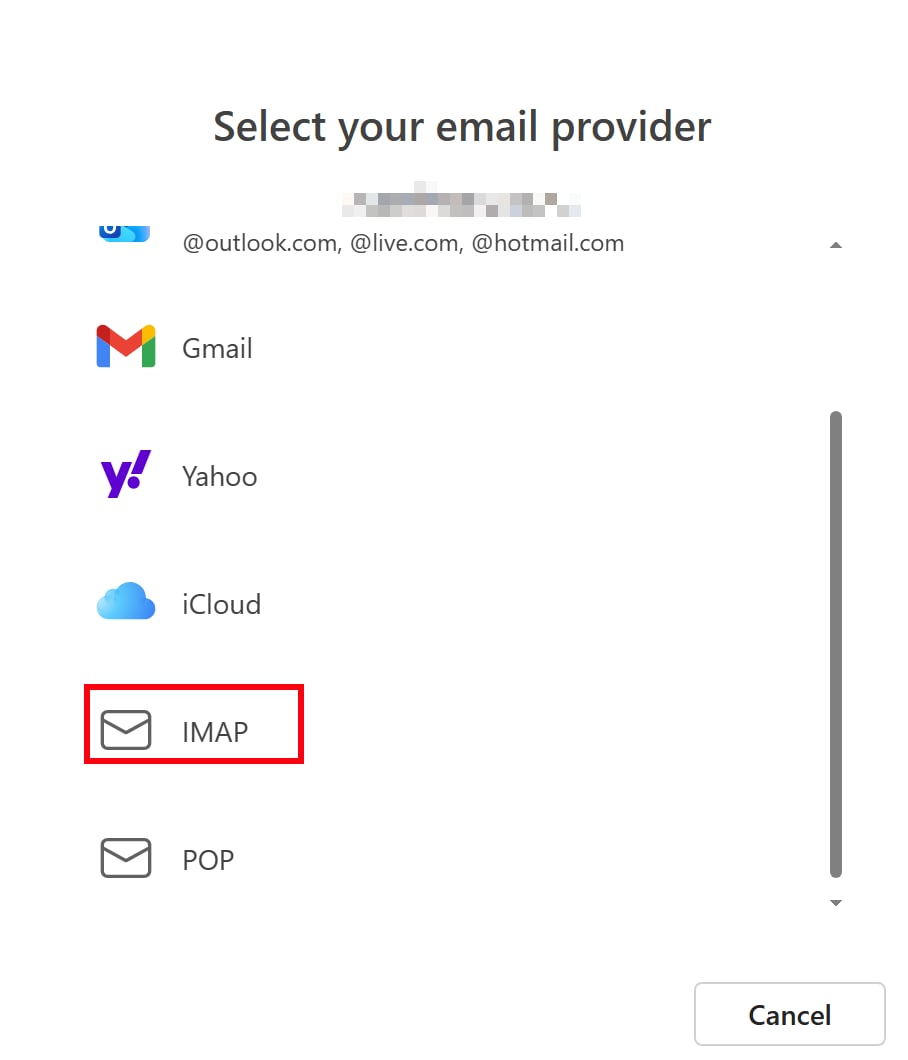
This guide explains how to connect your preferred email client or mobile device using IMAP, POP3, or Exchange ActiveSync (EAS).
**We recommend IMAP for most users** — it provides two-way synchronization and keeps all messages and folders stored on the server, accessible from any device.
> ⚠️ For security reasons, non-encrypted mail ports are not supported. Please use SSL/TLS or STARTTLS connections only.
***
## Protocol Comparison
| Feature | IMAP | POP3 |
| :---------------------- | :--------- | :----------------------- |
| Emails stored on server | Yes | No (downloaded locally) |
| Multi-device sync | Yes | No |
| Folder sync | Yes | Inbox only |
| Recommended for | Most users | Single-device users only |
***
## Server Connection Settings
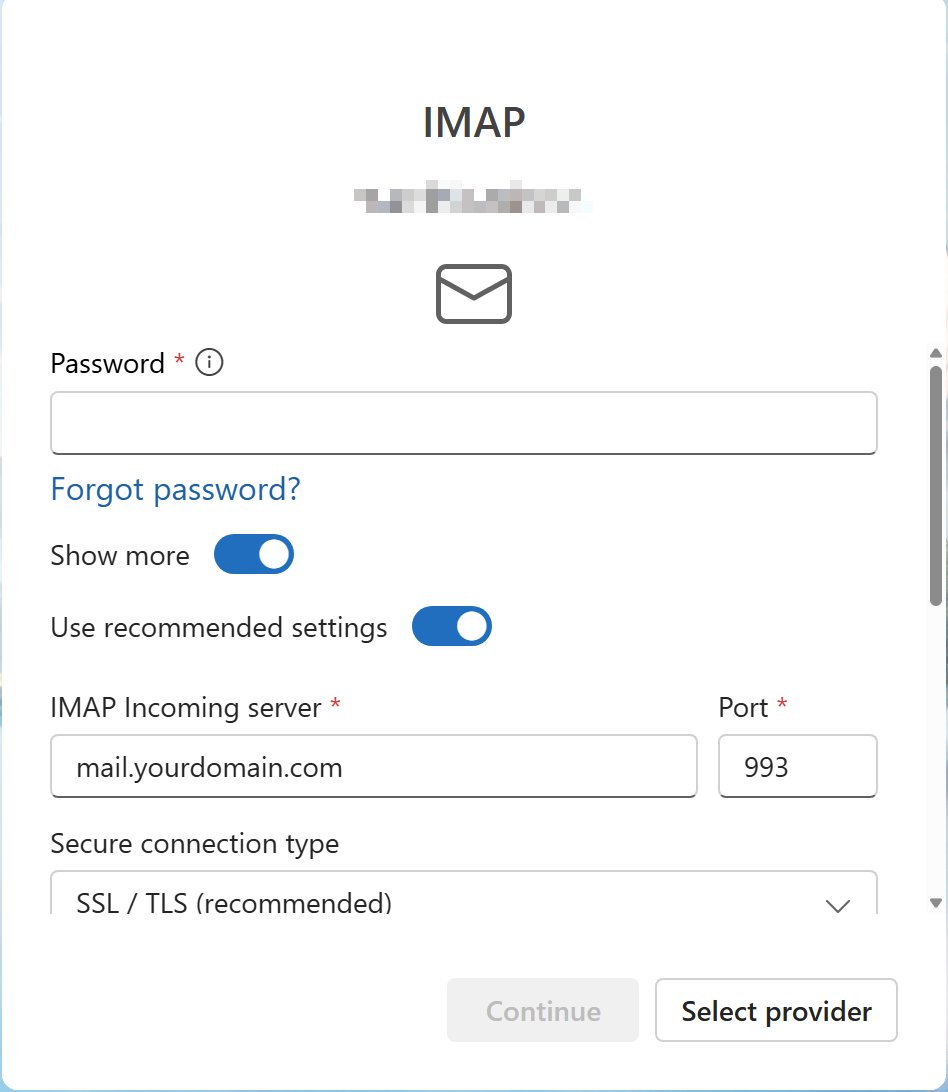
Replace `mail.yourdomain.com` with your actual mail server hostname. Contact your IT administrator if unsure.
### Incoming Mail — IMAP
| Setting | Value |
| :---------------- | :------------------------------------------------------------------------------- |
| Server / Hostname | mail.yourdomain.com |
| Port (SSL/TLS) | 993 |
| Encryption | SSL/TLS (required) |
| Authentication | Password |
| Username | Your full email address (e.g. [user@yourdomain.com](mailto:user@yourdomain.com)) |
### Incoming Mail — POP3
| Setting | Value |
| :---------------- | :---------------------- |
| Server / Hostname | mail.yourdomain.com |
| Port (SSL/TLS) | 995 |
| Encryption | SSL/TLS (required) |
| Authentication | Password |
| Username | Your full email address |
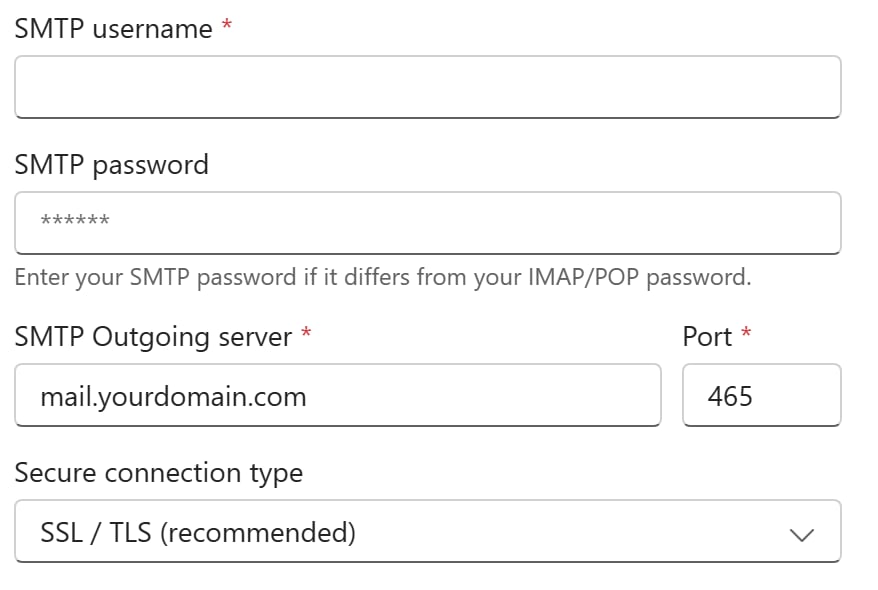
### Outgoing Mail — SMTP
| Setting | Value |
| :---------------- | :----------------------------- |
| Server / Hostname | mail.yourdomain.com |
| Port (SSL) | 465 |
| Port (STARTTLS) | 587 |
| Encryption | SSL/TLS or STARTTLS (required) |
| Authentication | Password (required) |
| Username | Your full email address |
***
## Device & Client Setup Guides
### iPhone / iPad (IMAP)
1. Open **Settings** and tap **Mail**.
2. Tap **Accounts**, then **Add Account**.
3. Select **Other**, then **Add Mail Account**.
4. Enter your Name, Email Address, Password, and a Description, then tap **Next**.
5. Ensure **IMAP** is selected at the top.
6. Enter Incoming Mail Server: Hostname = `mail.yourdomain.com`, Username = your full email address, Password = your webmail password.
7. Enter the same details for the Outgoing Mail Server (SMTP).
8. Tap **Next** and ensure SSL is enabled.
9. Tap the account name, scroll down and tap **Advanced**.
10. Set Incoming port to **993** (SSL/TLS); Outgoing port to **465** (SSL) or **587** (STARTTLS).
> 📖 Reference: [Configure IMAP for iPhone or iPad](https://portal.smartertools.com/kb/a3044/configure-imap-for-iphone-or-ipad.aspx)
***
### Mac Mail (IMAP)
1. Open **Mail** and go to **Mail > Add Account**.
2. Select **Other Mail Account** and click **Continue**.
3. Enter your name, email address, and password, then click **Sign In**.
4. If auto-detection fails, manually enter: Protocol = IMAP, Server = `mail.yourdomain.com`, Port = **993** (SSL/TLS).
5. Enter outgoing server: SMTP, `mail.yourdomain.com`, port **587** or **465**.
6. Click **Sign In** to complete setup.
> 📖 Reference: [Set up Mac Mail with IMAP](https://portal.smartertools.com/kb/a3067/set-up-mac-mail-with-imap.aspx)
***
### Windows Mail (IMAP)
1. Open **Mail** and go to **Mail > Add Account**.
2. Select **Other Mail Account** and click **Continue**.
3. Select your email provider, choose IMAP.
 4. Enter your password and IMAP then click **Continue**
5. If auto-detection fails, manually enter: Protocol = IMAP, Server = `mail.yourdomain.com`, Port = **993** (SSL/TLS).
6. Enter outgoing server: SMTP, `mail.yourdomain.com`, port **465**.
4. Enter your password and IMAP then click **Continue**
5. If auto-detection fails, manually enter: Protocol = IMAP, Server = `mail.yourdomain.com`, Port = **993** (SSL/TLS).
6. Enter outgoing server: SMTP, `mail.yourdomain.com`, port **465**.
 1. Click **Sign In** to complete setup.
### eM Client (IMAP or POP3)
1. Go to **Tools > Accounts > New Account**.
2. Expand the **Mail** section, choose **Other**, then click **Next**.
3. Enter your SmarterMail email address and click **Next**.
4. Select **IMAP** or **POP3** as the incoming server type and fill in the required fields.
5. Use the following secure ports:
* IMAP: **993** (SSL/TLS)
* POP3: **995** (SSL/TLS)
* SMTP: **465** (SSL) or **587** (STARTTLS)
6. Modify any auto-populated fields if necessary and click **Next**.
7. If configuration tests fail, click **Fix** to resolve errors, then click **Next**.
8. Set the display name for the account and click **Next**.
9. Click **Finish** to complete the setup.
> 📖 References:
>
> * [Configure IMAP or POP for eM Client](https://portal.smartertools.com/kb/a3046/configure-imap-or-pop-for-em-client.aspx)
> * [Configure eM Client for Exchange Web Services](https://portal.smartertools.com/kb/a3045/configure-em-client-for-exchange-web-services.aspx)
> * [Configure CardDAV and CalDAV for eM Client](https://portal.smartertools.com/kb/a3040/configure-carddav-and-caldav-for-em-client.aspx)
***
## Exchange ActiveSync (EAS)
Exchange ActiveSync synchronizes email, contacts, and calendar events. Supported on iPhone, Android, and Windows Phone.
### EAS on iPhone
1. Go to **Settings > Mail > Accounts > Add Account**.
2. Select **Microsoft Exchange**.
3. Enter your email address and a description, then tap **Next**.
4. Enter Server = `mail.yourdomain.com`, Username = your full email address, Password = your webmail password.
5. Choose which items to sync (Mail, Contacts, Calendars) and tap **Save**.
> 📖 Reference: [Configure Exchange ActiveSync on the iPhone](https://portal.smartertools.com/kb/a3042/configure-exchange-activesync-on-the-iphone.aspx)
***
### EAS on Android / Windows Phone
1. Go to device **Settings** and navigate to **Accounts** or **Email**.
2. Tap **Add Account** and select **Exchange** or **Corporate**.
3. Enter your full email address and password.
4. Enter Server = `mail.yourdomain.com`.
5. Accept any SSL certificate prompts if applicable.
6. Select data types to sync (Email, Calendar, Contacts) and complete setup.
> 📖 References:
>
> * [Configure Exchange ActiveSync on Windows Phones](https://portal.smartertools.com/kb/a3043/configure-exchange-activesync-on-windows-phones.aspx)
> * [Configure Exchange ActiveSync for Windows Phone 7](https://portal.smartertools.com/kb/a3041/configure-exchange-activesync-for-windows-phone-7.aspx)
> * [Configure Microsoft Exchange ActiveSync for Email Accounts](https://portal.smartertools.com/kb/a3047/configure-microsoft-exchange-activesync-for-email-accounts.aspx)
***
##
1. Click **Sign In** to complete setup.
### eM Client (IMAP or POP3)
1. Go to **Tools > Accounts > New Account**.
2. Expand the **Mail** section, choose **Other**, then click **Next**.
3. Enter your SmarterMail email address and click **Next**.
4. Select **IMAP** or **POP3** as the incoming server type and fill in the required fields.
5. Use the following secure ports:
* IMAP: **993** (SSL/TLS)
* POP3: **995** (SSL/TLS)
* SMTP: **465** (SSL) or **587** (STARTTLS)
6. Modify any auto-populated fields if necessary and click **Next**.
7. If configuration tests fail, click **Fix** to resolve errors, then click **Next**.
8. Set the display name for the account and click **Next**.
9. Click **Finish** to complete the setup.
> 📖 References:
>
> * [Configure IMAP or POP for eM Client](https://portal.smartertools.com/kb/a3046/configure-imap-or-pop-for-em-client.aspx)
> * [Configure eM Client for Exchange Web Services](https://portal.smartertools.com/kb/a3045/configure-em-client-for-exchange-web-services.aspx)
> * [Configure CardDAV and CalDAV for eM Client](https://portal.smartertools.com/kb/a3040/configure-carddav-and-caldav-for-em-client.aspx)
***
## Exchange ActiveSync (EAS)
Exchange ActiveSync synchronizes email, contacts, and calendar events. Supported on iPhone, Android, and Windows Phone.
### EAS on iPhone
1. Go to **Settings > Mail > Accounts > Add Account**.
2. Select **Microsoft Exchange**.
3. Enter your email address and a description, then tap **Next**.
4. Enter Server = `mail.yourdomain.com`, Username = your full email address, Password = your webmail password.
5. Choose which items to sync (Mail, Contacts, Calendars) and tap **Save**.
> 📖 Reference: [Configure Exchange ActiveSync on the iPhone](https://portal.smartertools.com/kb/a3042/configure-exchange-activesync-on-the-iphone.aspx)
***
### EAS on Android / Windows Phone
1. Go to device **Settings** and navigate to **Accounts** or **Email**.
2. Tap **Add Account** and select **Exchange** or **Corporate**.
3. Enter your full email address and password.
4. Enter Server = `mail.yourdomain.com`.
5. Accept any SSL certificate prompts if applicable.
6. Select data types to sync (Email, Calendar, Contacts) and complete setup.
> 📖 References:
>
> * [Configure Exchange ActiveSync on Windows Phones](https://portal.smartertools.com/kb/a3043/configure-exchange-activesync-on-windows-phones.aspx)
> * [Configure Exchange ActiveSync for Windows Phone 7](https://portal.smartertools.com/kb/a3041/configure-exchange-activesync-for-windows-phone-7.aspx)
> * [Configure Microsoft Exchange ActiveSync for Email Accounts](https://portal.smartertools.com/kb/a3047/configure-microsoft-exchange-activesync-for-email-accounts.aspx)
***
##